You have setup the availability groups. How would know that the availability groups are running fine?
All the good DBA’s always want to be notified via email when there are any issues related database servers not just only availability groups. In order to do this, you would need a alerts setup so that you can be notified.
What are the useful alerts for Availability Groups?
Here are few useful alerts you can setup on a fly.
- Availability Groups – Suspended
 USE [msdb]
GO
EXEC msdb.dbo.sp_update_alert @name=N'AG Data Movement - Suspended',
 @message_id=35264,
 @severity=0,
 @enabled=1,
 @delay_between_responses=0,
 @include_event_description_in=3,
 @database_name=N'',
 @notification_message=N'',
 @event_description_keyword=N'',
 @performance_condition=N'',
 @wmi_namespace=N'',
 @wmi_query=N'',
 @job_id=N'00000000-0000-0000-0000-000000000000'
GO
EXEC msdb.dbo.sp_update_notification @alert_name=N'AG Data Movement - Suspended', @operator_name=N'DBA', @notification_method = 7
GO
EXEC msdb.dbo.sp_update_notification @alert_name=N'AG Data Movement - Suspended', @operator_name=N'Robin', @notification_method = 7
GO
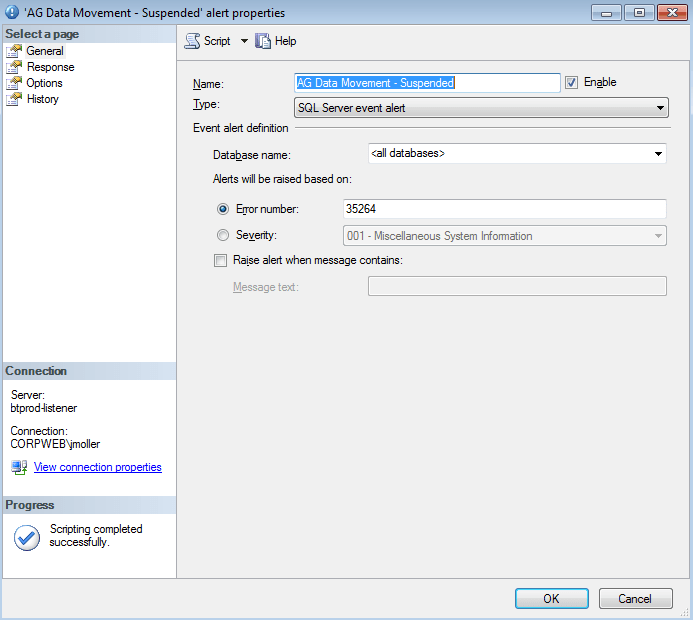
Error Number: 35264 indicates that the availability groups data movement suspended
- Availability Groups Data Movement – Resumed
USE [msdb]
GO
EXEC msdb.dbo.sp_update_alert @name=N'AG Data Movement - Resumed',
 @message_id=35265,
 @severity=0,
 @enabled=1,
 @delay_between_responses=0,
 @include_event_description_in=3,
 @database_name=N'',
 @notification_message=N'',
 @event_description_keyword=N'',
 @performance_condition=N'',
 @wmi_namespace=N'',
 @wmi_query=N'',
 @job_id=N'00000000-0000-0000-0000-000000000000'
GO
EXEC msdb.dbo.sp_update_notification @alert_name=N'AG Data Movement - Resumed', @operator_name=N'DBA', @notification_method = 7
GO
EXEC msdb.dbo.sp_update_notification @alert_name=N'AG Data Movement - Resumed', @operator_name=N'Robin', @notification_method = 7
GO
 
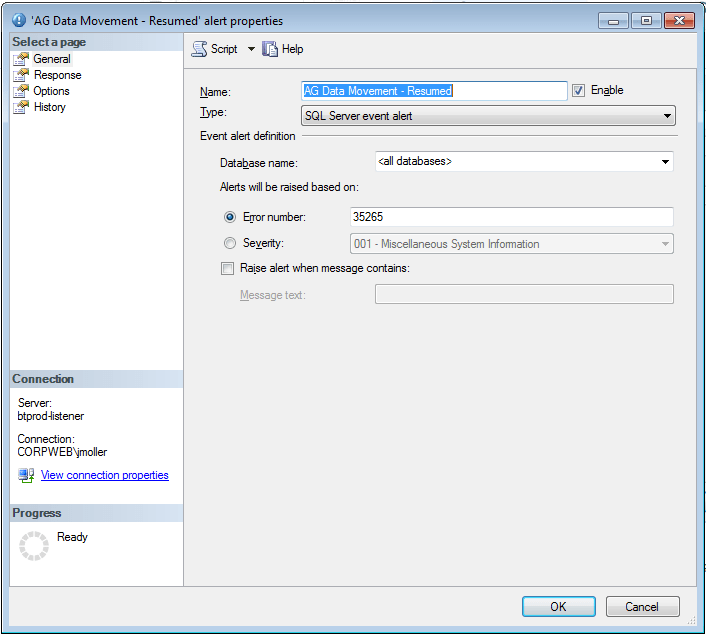
Error Number: 35265 indicates the availability groups data movement resumed
USE [msdb]
GO
EXEC msdb.dbo.sp_update_alert @name=N'AG Role change',
 @message_id=1480,
 @severity=0,
 @enabled=1,
 @delay_between_responses=0,
 @include_event_description_in=3,
 @database_name=N'',
 @notification_message=N'',
 @event_description_keyword=N'',
 @performance_condition=N'',
 @wmi_namespace=N'',
 @wmi_query=N'',
 @job_id=N'00000000-0000-0000-0000-000000000000'
GO
EXEC msdb.dbo.sp_update_notification @alert_name=N'AG Role change', @operator_name=N'DBA', @notification_method = 7
GO
EXEC msdb.dbo.sp_update_notification @alert_name=N'AG Role change', @operator_name=N'Robin', @notification_method = 7
GO

Error Number 1480 indicates the Availability groups role change
There are many reasons availability groups fails. I have mentioned only few which are important to know.
For a long list of alerts you can configure the alerts based on severity level
Example of these alerts are as below:
Error 976, Severity 14 : The target database, ‘%.*ls’, is participating in an availability group and is currently not accessible for queries. Either data movement is suspended or the availability replica is not enabled for read access. To allow read-only access to this and other
Error 983, Severity 14: Unable to access database ‘%.*ls’ because its replica role is RESOLVING which does not allow connections. Try the operation again later.
Error 3402, Severity 10: The database ‘%ls’ is marked %ls and is in a state that does not allow recovery to be run.
Error 3633, Severity 16: The operating system returned the error ‘%ls’ while attempting ‘%ls’ on ‘%ls’ at ‘%hs'(%d).
Error 3752, Severity 16: The database ‘%.*ls’ is currently joined to an availability group. Before you can drop the database, you need to remove it from the availability group.
Error 19405, Severity 16: Failed to create, join or add replica to availability group ‘%.*ls’, because node ‘%.*ls’ is a possible owner for both replica ‘%.*ls’ and ‘%.*ls’. If one replica is failover cluster instance, remove the overlapped node from its possible owners and try ag
Error 19406, Severity 10: The state of the local availability replica in availability group ‘%.*ls’ has changed from ‘%ls’ to ‘%ls’. The replica state changed because of either a startup, a failover, a communication issue, or a cluster error.
Error 19456, Severity 16: None of the IP addresses configured for the availability group listener can be hosted by the server ‘%.*ls’. Either configure a public cluster network on which one of the specified IP addresses can be hosted, or add another listener IP address
Error 19471, Severity 16: The WSFC cluster could not bring the Network Name resource with DNS name ‘%ls’ online. The DNS name may have been taken or have a conflict with existing name services, or the WSFC cluster service may not be running or may be inaccessible.
Error 19476, Severity 16: The attempt to create the network name and IP address for the listener failed. The WSFC service may not be running or may be inaccessible in its current state, or the values provided for the network name and IP address may be incorrect. Check the state of the WFSC cluster and validate the network name and IP address with the network administrator
Error 35206, Severity 10: A connection timeout has occurred on a previously established connection to availability replica ‘%ls’ with id [%ls]. Either a networking or a firewall issue exists or the availability replica has transitioned to the resolving role.
Error 35240, Severity 16: Database ‘%.*ls’ cannot be joined to or unjoined from availability group ‘%.*ls’. This operation is not supported on the primary replica of the availability group.
Error 35250, Severity 16: The connection to the primary replica is not active. The command cannot be processed.
Error 41009, Severity 16: The Windows Server Failover Clustering (WSFC) resource control API returned error code %d. The WSFC service may not be running or may not be accessible in its current state, or the specified arguments are invalid.
Error 41015, Severity 16: Failed to obtain the Windows Server Failover Clustering (WSFC) node handle (Error code %d). The WSFC service may not be running or may not be accessible in its current state, or the specified cluster node name is invalid.
Error 41042, Severity 16: The availability group ‘%.*ls’ already exists. This error could be caused by a previous failed CREATE AVAILABILITY GROUP or DROP AVAILABILITY GROUP operation. If the availability group name you specified is correct, try dropping the availability group
Error 41050, Severity 10: AlwaysOn Availability Groups: Waiting for local Windows Server Failover Clustering service to start. This is an informational message only. No user action is required
Error 41052, Severity 10: AlwaysOn Availability Groups: Waiting for local Windows Server Failover Clustering node to start. This is an informational message only. No user action is required.
Error 41066, Severity 16: Cannot bring the Windows Server Failover Clustering (WSFC) resource (ID ‘%.*ls’) online (Error code %d). The WSFC service may not be running or may not be accessible in its current state
Error 41074, Severity 10: AlwaysOn: The local replica of availability group ‘%.*ls’ is preparing to transition to the primary role in response to a request from the Windows Server Failover Clustering (WSFC) cluster. This is an informational message only. No user action is required
Error 41091, Severity 10: AlwaysOn: The local replica of availability group ‘%.*ls’ is going offline because either the lease expired or lease renewal failed. This is an informational message only. No user action is required.
Error 41095, Severity 10: AlwaysOn: Explicitly transitioning the state of the Windows Server Failover Clustering (WSFC) resource that corresponds to availability group ‘%.*ls’ to Failed. The resource state is not consistent with the availability group state in the instance of SQL
Error 41131, Severity 10: Failed to bring availability group ‘%.*ls’ online. The operation timed out. Verify that the local Windows Server Failover Clustering (WSFC) node is online. Then verify that the availability group resource exists in the WSFC cluster
Error 41142, Severity 16: The availability replica for availability group ‘%.*ls’ on this instance of SQL Server cannot become the primary replica. One or more databases are not synchronized or have not joined the availability group, or the WSFC cluster was started in Force Quorum
Error 41152, Severity 16: Failed to create availability group ‘%.*ls’. The operation encountered SQL Server error %d and has been rolled back. Check the SQL Server error log for more details. When the cause of the error has been resolved, retry CREATE AVAILABILITY GROUP command
Error 41158, Severity 16: Failed to join local availability replica to availability group ‘%.*ls’. The operation encountered SQL Server error %d and has been rolled back. Check the SQL Server error log for more details. When the cause of the error has been resolved
Error 41160, Severity 16: Failed to designate the local availability replica of availability group ‘%.*ls’ as the primary replica. The operation encountered SQL Server error %d and has been terminated. Check the preceding error and the SQL Server error log for more details
Error 41172, Severity 16: An error occurred while dropping availability group ‘%.*ls’ from Windows Server Failover Clustering (WSFC) cluster and from the local metadata. The operation encountered SQL OS error %d, and has been terminated.
Error 41195, Severity 16: Availability group ‘%.*ls’ failed to process the WSFC lease-renewal command. The local availability replica lease is no longer valid to process the lease renewal command. Availability replica lease expired. This is an informational message only.
Error 41406, Severity 16: The availability group is not ready for automatic failover. The primary replica and a secondary replica are configured for automatic failover, however, the secondary replica is not ready for an automatic failover. Possibly the secondary replica is unavailable.
Error 41414, Severity 16: In this availability group, at least one secondary replica is not connected to the primary replica. The connected state is DISCONNECTED.
All you need is configure the alerts based on severity level. Severity level 16 to 25 is considered as critical.
References:
https://msdn.microsoft.com/en-us/library/dn135328(v=sql.110).aspx
Click to access Troubleshooting%20SQL%20Server%20AlwaysOn.pdf
Hope you enjoyed the post!
Cheers
Ramasankar Molleti
LinkedIn: LinkedIn Profile
Twitter: Twitter