
In this example, i would like to demonstrate how to create a AWS DynamoDB table using python.
I’m taking the simple employee table which contains Id, FirstName, LastName, Dept and Sal columns. Also, i’m going to create a Partition key on id and sort key on Sal columns. I will use boto3 to call the dynamodb service. For more information about boto3 you can refer here.
import boto3
# Create a table Employee

dynamodb = boto3.resource('dynamodb', region_name='us-east-1')

mytable = dynamodb.create_table(
TableName= 'Employee',
KeySchema=[
{
'KeyType': 'HASH',
'AttributeName': 'Id'
},
{
'KeyType': 'RANGE',
'AttributeName': 'Sal'
}
],
AttributeDefinitions=[
{
'AttributeName': 'Id',
'AttributeType': 'N'
},
{
'AttributeName': 'Sal',
'AttributeType': 'N'
}
],
ProvisionedThroughput={
'ReadCapacityUnits': 2,
'WriteCapacityUnits': 2
}
)
# Wait until the table creation complete.
mytable.meta.client.get_waiter('table_exists').wait(TableName='Employee')
print('Table has been created, please continue to insert data.')
If you look at the definition of the attribute while creating table i only mentioned partition key and sort key for creating table and did not specify any other column names (FirstName, LastName, Dept and Sal). With Dynamodb (NOSQL Database) you don’t need to specify every record attribute field ahead of time. You only need to specify the hash and range fields ahead of time.
This will create a table called Employee as below

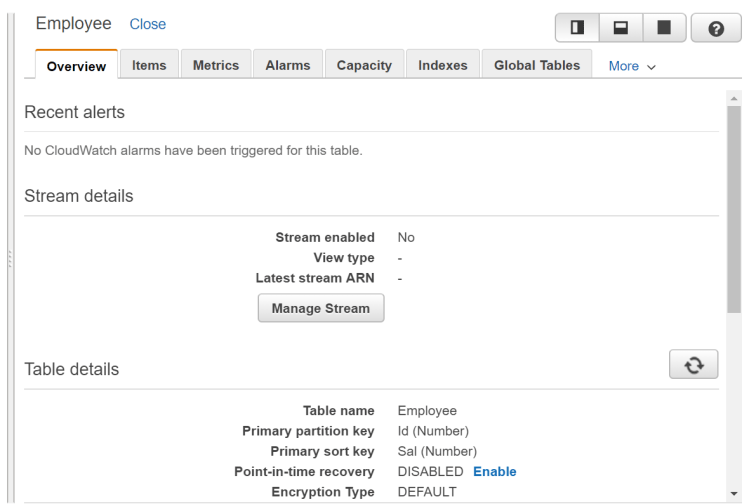
As you can see the table Employee created with partition key as Id and Sort key as Sal.
Let’s insert data into table. Use the below script to insert the data. you can use put_item method to insert the data to dynamodb. You can see the syntax here
mytable.put_item(
    Item={
        'Id': 1,
        'FirstName': 'Ramasankar',
        'LastName': 'Molleti',
        'Dept': 'IT',
        'Sal': 5000
    }
)
mytable.put_item(
    Item={
        'Id': 1,
        'FirstName': 'Sourav',
        'LastName': 'Mukherjee',
        'Dept': 'IT',
        'Sal': 10000
    }
)
mytable.put_item(
    Item={
        'Id': 1,
        'FirstName': 'Praveen',
        'LastName': 'Kumar',
        'Dept': 'Finance',
        'Sal': 5000
    }
)
mytable.put_item(
    Item={
        'Id': 1,
        'FirstName': 'Suresh',
        'LastName': 'Kumar',
        'Dept': 'Finance',
        'Sal': 12000
    }
)

response = mytable.scan()

for i in response['Items']:
    print("added item:", i['Id'], ":", i['FirstName'], ":", i['LastName'], ":", i['Dept'], ":", i['Sal'])
Output:
added item: 1 : Praveen : Kumar : Finance : 5000
added item: 1 : Sourav : Mukherjee : IT : 10000
added item: 1 : Suresh : Kumar : Finance : 12000
Process finished with exit code 0
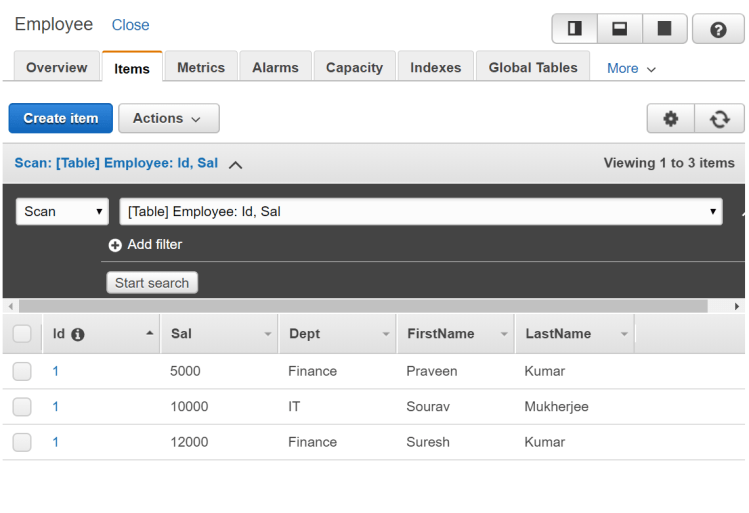
As you can see the data has been inserted. That’s it for creating and inserting data into dynamodb. Here is the below combined script. In this example i also mentioned that i used provisioned read and write throughput to use 2 instead of default values
import boto3
# Create a table called Employee

dynamodb = boto3.resource('dynamodb', region_name='us-east-1')
mytable = dynamodb.create_table(
TableName= 'Employee',
KeySchema=[
{
'KeyType': 'HASH',
'AttributeName': 'Id'
},
{
'KeyType': 'RANGE',
'AttributeName': 'Sal'
}
],
AttributeDefinitions=[
{
'AttributeName': 'Id',
'AttributeType': 'N'
},
{
'AttributeName': 'Sal',
'AttributeType': 'N'
}
],
ProvisionedThroughput={
'ReadCapacityUnits': 2,
'WriteCapacityUnits': 2
}
)
# Wait until the table exists.
mytable.meta.client.get_waiter('table_exists').wait(TableName='Employee')
print('Table is ready, please continue to isert data.')

# Insert the data into dynamodb table
mytable.put_item(
Item={
'Id': 1,
'FirstName': 'Ramasankar',
'LastName': 'Molleti',
'Dept': 'IT',
'Sal': 5000
}
)
mytable.put_item(
Item={
'Id': 1,
'FirstName': 'Sourav',
'LastName': 'Mukherjee',
'Dept': 'IT',
'Sal': 10000
}
)
mytable.put_item(
Item={
'Id': 1,
'FirstName': 'Praveen',
'LastName': 'Kumar',
'Dept': 'Finance',
'Sal': 5000
}
)
mytable.put_item(
Item={
'Id': 1,
'FirstName': 'Suresh',
'LastName': 'Kumar',
'Dept': 'Finance',
'Sal': 12000
}
)

response = mytable.scan()

for i in response['Items']:
print("added item:", i['Id'], ":", i['FirstName'], ":", i['LastName'], ":", i['Dept'], ":", i['Sal'])
Hope you enjoyed the post.
Cheers
Ramasankar Molleti
